How to Update Facebook Messenger for PC?
One of the best apps of the moment in terms of messaging, is Messenger from Facebook, Inc. Today this App has been installed more than a billion times, reaching what until now was the favorite: WhatsApp. Due to the large amount of information being handled (conversations and user data), it is extremely important to know how to update Facebook Messenger for PC. The reason is very simple, keep the App to its latest version available; is our only defensive tool as users of it.
Steps to Update Facebook Messenger for PC ( Windows 10 )
When it comes to Windows 10, updating Facebook Messenger for PC becomes very simple; this thanks to the ease offered by the Microsoft Storeitself. Through it, and following a few simple steps; we can purchase, install and update this app whenever we need it. All completely free of charge and with the security offered by carrying out these processes from an official source.

In case you want to update Facebook Messenger for Windows 10,just follow the following 10 simple steps:
- Deploys the Start menu your PC. It is the Icon with the Windows window located in the lower left corner.
- By default, Windows 10 has its store pinned to the Startmenu. There you should find her and get into it.
- If Windows Store does not focus pinned to the Startmenu,tap the Magnifier icon on your right to display the search bar. Type Windows Store and enter the store.
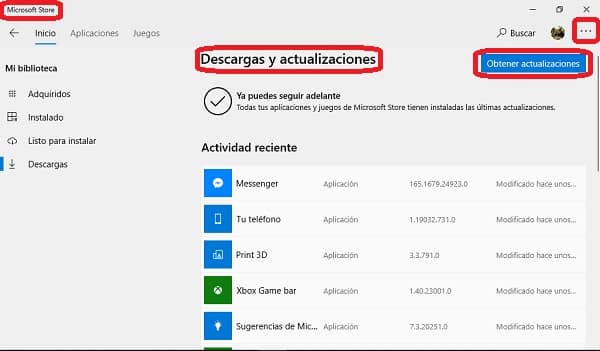
- At the top right of the screen, just below the“X”(Close); you will find the More Information button (the symbol is made up of three dots on a white background).
- After clicking More Information, select Downloads and updates; which is the first option that will appear to you.
- You’ll then be sent to a screen where you’ll find a list of all the apps and games that have a pending update. There you’ll have to search for Messenger and click the Update button right next to it.
- You can also click Update All. This way you’ll be able to update Facebook Messenger for PC along with the rest of Apps and games that have a new version available.
- If Messenger isn’t listed, it’s because – maybe – it’s already updated to its latest version. However, you can click the Get Updatesbuttonin the top right; for Windows Store to initiate a forced search for possible updates.
- In case Windows Store finds a new Messenger update, it’s just a matter of clicking the Updatebutton.
- Close the Microsoft Store and open your updated Facebook Messenger to its latest version.
Set up automatic Messenger for PC updates

If you don’t like the idea of having to perform the above steps, you can choose to configure your Microsoft Store to automatically manage Messenger updates and all other Apps you have installed. To perform this setup, you only have to follow the following directions once and forget about the topic forever:
- Open Microsoft Store. Remember, we’ve shown you how to do it upstairs.
- Click the Learn Morebutton.
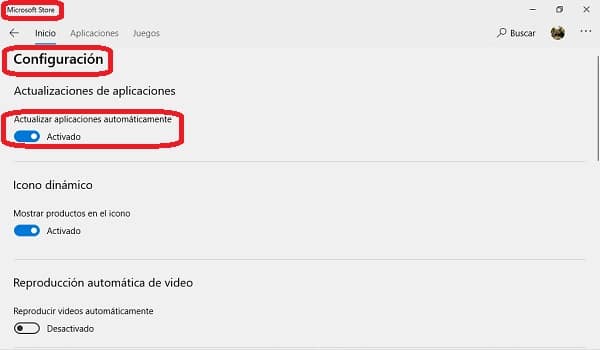
- From the menu that is displayed, select Settings (this is the second option).
- The first section that appears to you to configure, is precisely that of Application Updates. There you must activate the Automatically update appsbutton. To enable this setting, the button must be shifted to the right (it will be blue).
- Close the Microsoft Store and start enjoying a Facebook Messenger ALWAYS updated to its latest version.
Keep in mind that setting this option can be a real headache for some. Automatic updates take place in the background and without you noticing… except for the fact that if you’re in an online video game or video call, you’ll notice that the quality of your connection is reduced in case an update is taking place right now.
What if you use another operating system?
In case you don’t have Windows 10, from where you can update Facebook Messenger for PC officially; we have prepared for you two download files for other operating systems. The first contains the latest version of Facebook Messenger for Windows 7, Windows 8, Windows 8.1 and Windows 10. While the second file contains the latest version of Messenger for macOS 10.10 onwards. Both links will take you to a direct and completely secure download from Mega.

In both cases, what you need to do to install the most up-to-date version is as follows:
- Go to the download folder and double-click the file to run it.
- In case you are asked, accept the administrator permission.
- Read the message on the screen that appears to you, and then click Next.
- On the next screen select Ignore. Here you will be offered other completely different products to install along with Messenger.
- When the download is complete, click Finish.
- Open the App and sign in with your Facebook account.
One important thing you should know is that this is not an official version of Facebook Messenger for PC. It is an application developed by a third party, but that has the ability to legally link to Facebook to incorporate your contacts and conversations in the same way that the official Messenger does.
In other words, you can use it perfectly as the original version, but Facebook will not be responsible for any inconvenience you may have with this App. However, this version of Messenger has an excellent reputation among its users; so it’s not wrong to recommend it. In fact, we ourselves have been testing it for a couple of weeks without presenting a single problem.
