How to Update Facebook?
Facebook.com has been with us for over a decade as one of our main websites. Throughout all this time, it has only grown; currently gathering up to 2 billion active users in a month. Now, the website has evolved into a downloadable application for our computer. However, due to the large flow of information it handles; it is extremely important to know how to update Facebook to safeguard the integrity of our personal data and conversations.
Security being one of the main focuses of updates. Which very few users know and that’s why they don’t pay them the attention they deserve. Most believe that Facebook app updates are aimed at improving the look and feel of its interface and creating new features.
But the truth is, in most updates; there are almost never any visible or noticeable changes. Along with security reinforcement,another main focus is error correction and optimization of existing functions.
Seven Steps to Update Facebook on a Computer (Windows 10)
One of the best advantages for which we use Windows 10 is that, thanks to its app store; we can easily access a tool that allows us to both download and update Facebook on the computer. And all with the confidence and security offered by an official source like the Microsoft Store. It also gives us access to the equally official version of Facebook.

If you have doubts about the version of your apps, you can learn how to update Facebook on a Laptop or Windows 10 PC by following these seven simple steps:
- Displays the Startmenu. To do this, click on the icon with the traditional Windows window. This one is located at the bottom left of the desktop.
- Log in to the Microsoft Store. Normally, its shortcut is pinned to the start menu. If this isn’t your case, search for the store by typing Microsoft Store in the magnifying glass (search bar) located right on the right side of the Starticon.
- Go to Learn More. This button is represented by a three-point icon on a white background. It is located at the top right, just below the Close button (X).
- Select Downloads & Updates. This is the first menu option that is displayed after performing the previous step.
- Click Update. After the previous step you will find yourself on a screen showing all your apps with pending updates. Among them, search for Facebook and click the Update button on your right.
- Wait for Facebook to update. At this point all you can do is wait for the new version to be downloaded and installed. Note that this Facebook App weighs around 450Mb, so its updates may take a few or many minutes depending on the quality of the connection.
- Restart Facebook. If you had the App open during the upgrade process, you’ll need to close it and open it again for the changes to take effect and you can enjoy them. You can also close the Microsoft Store now.
Some important things to keep in mind
When you try to carry out the process described above, you may run into one obstacle or a simple doubt. If you read the following important aspects that you should keep in mind,you will surely be able to update Facebook without any problem.

- If you’re offered many Apps available to update on the Downloads and Updatesscreen, you can choose to click the Update Allbutton. By doing this you get all the apps, not only Facebook; download their respective updates at the same time.
- In the list in the Downloads and Updatessection, you may not see Facebook. If this is the case, chances are you already have the App updated to its latest version; why it has no case to appear on the list.
- This may be because the Microsoft Store did its final poll just before a new version of Facebookwas released. This way, the App won’t appear in the Downloads and Updates list until the next time the Microsoft Store system does a new search.
- To dismiss the above, you can make use of the button Get updates that appears on the Downloads and Updates screen. When you click on it, the Microsoft Store will initiate a forced search for new updates.
- Finally, if you notice that your Facebook app is always kept up to date; then it’s because you have the Automatically update appsoption turned on. If this is not the case, but you would like to have that option enabled, then do not worry that right now we will teach you how to do it.
How to turn on Facebook Automatic Updates
Before we teach you how to turn on Facebook’s automatic updates,we need to clarify at least a couple of things for you. First, this option cannot be enabled only for Facebook; it applies to all Apps in your Microsoft store as they purchase new versions.

Second, automated updates can be a problem for some users. When an update is detected by the Microsoft Store,it will automatically download it in the background; without you noticing. But if this happens when you’re in an online multiplayer video game, or an online business conference; the quality of your connection will be aggravated by the data consumed by the download causing you inconveniences.
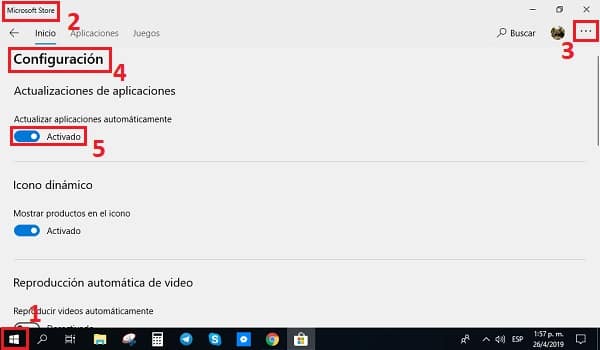
Now that you know that this option to update Facebook should be taken carefully, we’ll show you the five steps to learn how to turn on automatic updates from the Microsoft Store:
- Displays the menu Home.
- Log in to the Microsoft Store.
- Click the Learn Morebutton.
- Select the Settingsoption.
- Turn on the Automatically update appsbutton.
